
If your Honda GCV160 engine is hard to start, worn or damaged piston rings could be the culprit. This guide walks you through diagnosing, removing, inspecting, and replacing the piston ring set to restore smooth, reliable starts.
Key Takeaways
- Hard starting on the GCV160 often points to compression loss due to worn or broken piston rings, which seal the combustion chamber.
- Performing a compression test is the first diagnostic step—low readings typically indicate piston ring or cylinder wear.
- Always replace piston rings in sets and inspect the cylinder bore for scoring or wear before installing new rings.
- Proper ring gap and orientation are critical—incorrect installation can cause engine damage or continued hard starting.
- Use OEM or high-quality aftermarket rings to ensure longevity and proper engine performance.
- Lubricate new rings and cylinder walls during assembly to prevent scuffing during initial startup.
- Reassemble carefully and test thoroughly—a successful repair should restore normal cranking and smooth ignition.
Quick Answers to Common Questions
Tip/Question?
Should I replace just one piston ring or the entire set?
Always replace the entire piston ring set. Mixing old and new rings can lead to poor sealing and uneven wear.
Tip/Question?
Can I reuse the old piston if I’m only replacing the rings?
Yes, if the piston shows no scoring, cracks, or excessive wear. Always clean it thoroughly and inspect the ring grooves.
Tip/Question?
How do I know which way the piston arrow points?
The arrow on the piston top should point toward the exhaust port, usually marked on the engine or cylinder head.
Tip/Question?
Is it necessary to hone the cylinder when replacing rings?
Only if the cylinder is glazed or has light scoring. Deep damage requires professional boring or replacement.
Tip/Question?
What oil should I use during break-in?
Use a high-quality 4-stroke oil like 10W-30 or 20W-50. Avoid synthetic oils during the first 5 hours to aid ring seating.
Introduction: Why Is Your GCV160 Hard to Start?
If you own a Honda GCV160 engine—commonly found in lawn mowers, pressure washers, or small generators—you know how frustrating it can be when the engine cranks but won’t start, or takes multiple pulls to fire up. While fuel, spark, and air issues are common suspects, one often overlooked cause is a failing piston ring set. Over time, piston rings wear down, lose tension, or even crack, leading to poor compression. Without proper compression, the air-fuel mixture can’t ignite efficiently, resulting in hard starting, rough idling, or loss of power.
This comprehensive troubleshooting guide will walk you through diagnosing, disassembling, inspecting, and replacing the piston ring set on your GCV160 engine. Whether you’re a DIY enthusiast or a small engine repair technician, this step-by-step manual will help you restore your engine’s performance with confidence. You’ll learn how to identify piston ring failure, perform a compression test, safely remove the engine components, install new rings correctly, and avoid common pitfalls. By the end, your GCV160 should start smoothly and run reliably once again.
Understanding the Role of Piston Rings in the GCV160
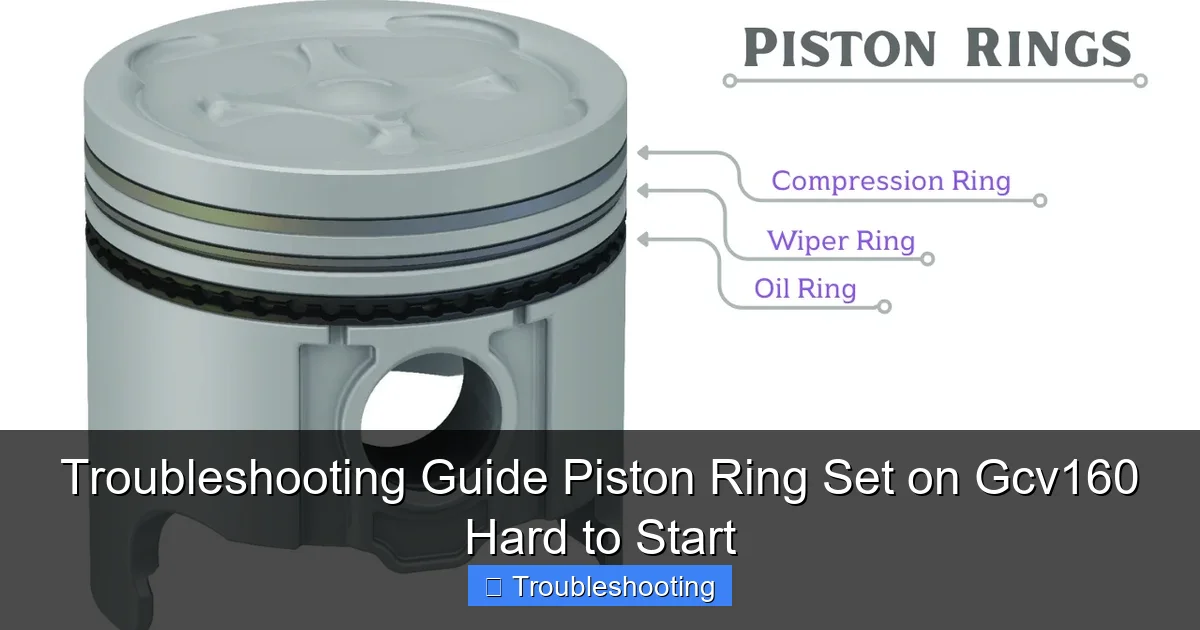
Before diving into repairs, it’s important to understand what piston rings do and why they’re critical to engine operation. The GCV160 is a single-cylinder, 4-stroke engine with a displacement of 160cc. Inside the cylinder, the piston moves up and down, compressing the air-fuel mixture before ignition. The piston ring set—typically two compression rings and one oil control ring—forms a tight seal between the piston and the cylinder wall.
Visual guide about Troubleshooting Guide Piston Ring Set on Gcv160 Hard to Start
Image source: mendmotor.com
The top two rings (compression rings) prevent combustion gases from escaping into the crankcase during the power stroke. The bottom ring (oil control ring) scrapes excess oil off the cylinder wall to prevent it from entering the combustion chamber. When these rings wear out, they lose their ability to seal properly. This leads to compression loss, which directly affects starting performance. You might notice black smoke, oil burning, or a weak spark due to fouled plugs—all signs that the rings are no longer doing their job.
In the GCV160, piston ring failure is often caused by prolonged use, lack of maintenance, overheating, or running the engine with dirty air filters. Over time, carbon buildup can cause rings to stick in their grooves, reducing their flexibility and sealing ability. Additionally, if the engine has been flooded or run with incorrect fuel mixtures, it can accelerate wear. Recognizing these symptoms early can save you from more extensive engine damage down the line.
Diagnosing Hard Starting: Is It the Piston Rings?
Not every hard-starting issue is due to piston rings. Before tearing into the engine, rule out other common causes. Start with the basics: check the spark plug, fuel system, air filter, and carburetor. A fouled spark plug or clogged fuel line can mimic compression problems. However, if those components are in good condition and the engine still struggles to start, it’s time to investigate compression.

Visual guide about Troubleshooting Guide Piston Ring Set on Gcv160 Hard to Start
Image source: landrovertreasureshop.com
Step 1: Perform a Compression Test
The most reliable way to determine if piston rings are the issue is by conducting a compression test. You’ll need a small engine compression gauge, which threads into the spark plug hole.
- Remove the spark plug and insert the compression gauge snugly into the spark plug hole.
- Pull the starter rope several times (or use an electric starter if equipped) while holding the throttle wide open.
- Observe the maximum reading on the gauge. A healthy GCV160 should produce between 90 and 120 PSI.
If the reading is below 80 PSI, especially if it’s significantly lower (e.g., 50 PSI or less), compression loss is likely. To confirm it’s the rings and not a valve issue, perform a “wet” compression test: add a tablespoon of engine oil into the cylinder through the spark plug hole and retest. If compression increases dramatically, the problem is likely worn piston rings or cylinder walls. If there’s little change, the valves may be leaking.
Step 2: Inspect for Other Symptoms
Look for additional signs that point to piston ring failure:
- Excessive oil consumption: Burning oil in the exhaust indicates oil is getting past the rings.
- Blue or gray smoke from the exhaust: This is a classic sign of oil burning.
- Weak or inconsistent power: The engine may start but lack acceleration or stall under load.
- Carbon buildup on the spark plug: Oily, black deposits suggest oil is entering the combustion chamber.
If multiple symptoms align, proceed with disassembly to inspect the piston and rings.
Tools and Materials You’ll Need
Before beginning the repair, gather the following tools and supplies to ensure a smooth process:
- Socket wrench set (8mm, 10mm, 12mm)
- Piston ring compressor tool
- Piston ring expander or flat screwdrivers (for removal)
- Torque wrench
- Small engine compression tester
- Clean rags and brake cleaner
- Engine assembly lube or 20W-50 motor oil
- New piston ring set (OEM or high-quality aftermarket)
- Feeler gauge (for checking ring end gap)
- Workbench or stable surface
- Safety glasses and gloves
Always work in a clean, well-lit area to avoid losing small parts or introducing debris into the engine.
Step-by-Step: Removing the Engine Components
Now that you’ve confirmed piston ring issues, it’s time to disassemble the engine. Follow these steps carefully to avoid damage.
Step 1: Drain the Engine Oil
Start by draining the engine oil to prevent spills during disassembly. Tilt the engine or use an oil extraction pump to remove all oil from the crankcase. This also gives you access to the oil drain plug if needed later.
Step 2: Remove the Carburetor and Air Filter
Disconnect the fuel line and remove the carburetor to access the intake side. Take off the air filter housing and set it aside. Label any hoses or linkages so you can reassemble them correctly.
Step 3: Remove the Muffler and Exhaust Components
Unbolt the muffler from the cylinder head. This gives you better access to the head and reduces the risk of damaging the exhaust during disassembly.
Step 4: Remove the Cylinder Head
Using a socket wrench, remove the four cylinder head bolts in a crisscross pattern to avoid warping the head. Gently lift the cylinder head off the engine block. You’ll now see the top of the piston and the valve train.
Step 5: Remove the Spark Plug and Valve Cover
Remove the spark plug and the valve cover (if applicable). On the GCV160, the valves are typically overhead, so you may need to inspect valve clearance later. Set the cover and gasket aside carefully.
Step 6: Remove the Piston and Connecting Rod
This is the most delicate part of the process. The piston is connected to the crankshaft via a connecting rod and wrist pin.
- Rotate the crankshaft until the piston is at bottom dead center (BDC).
- Remove the connecting rod cap bolts using a socket wrench.
- Gently tap the connecting rod cap off with a rubber mallet if needed.
- Carefully push the piston and connecting rod assembly out through the top of the cylinder bore.
Be extremely careful not to scratch the cylinder walls or damage the rod bearings. Lay the piston assembly on a clean surface with the rings facing up.
Inspecting the Piston and Rings
With the piston removed, it’s time to inspect the condition of the rings and cylinder.
Step 1: Remove the Old Piston Rings
Use a piston ring expander tool or two flathead screwdrivers to carefully pry the rings out of their grooves. Work slowly to avoid breaking the rings or scratching the piston. Note the orientation of each ring—most have a marking (like a dot or “TOP”) that must face upward during installation.
Step 2: Inspect the Piston
Check the piston for:
- Scoring or scratches: Light scoring can be polished out, but deep grooves mean the piston or cylinder needs replacement.
- Carbon buildup: Clean the top of the piston and ring grooves with a soft wire brush and brake cleaner.
- Wear on the skirt: Excessive wear indicates cylinder damage.
Step 3: Inspect the Cylinder Bore
Use a bore gauge or telescoping gauge to measure the cylinder diameter at the top, middle, and bottom. Compare the readings—if there’s more than 0.003 inches of taper or out-of-roundness, the cylinder may need honing or replacement. Also, look for scoring, pitting, or glazing. A glazed cylinder can be lightly honed with a flexible hone, but deep damage requires professional repair.
Step 4: Check Ring End Gap
Even if you’re replacing the rings, it’s good practice to check the end gap of the old ones. Insert each ring into the cylinder bore (about 1 inch deep) and use a feeler gauge to measure the gap between the ends. The correct gap for GCV160 rings is typically 0.008 to 0.016 inches. If the gap is too large, the rings are worn beyond use.
Installing the New Piston Ring Set
Now that you’ve confirmed the need for new rings, it’s time to install them correctly.
Step 1: Prepare the New Rings
Inspect the new piston ring set for damage or defects. Most quality rings come pre-gapped, but always verify the end gap using the method above. If the gap is too small, carefully file the ends with a fine file until it meets specification. Never force rings into the cylinder—this can cause breakage.
Step 2: Install the Rings on the Piston
Install the rings in the correct order, starting from the top:
- Top compression ring: Usually marked and has a barrel or taper face. Install with the mark facing up.
- Second compression ring: Often has a different profile (e.g., tapered or scraper). Also install with the mark up.
- Oil control ring: Typically a three-piece design with two thin rails and an expander. Install the expander first, then the rails, ensuring the gaps are staggered.
Use a piston ring expander tool to avoid damaging the rings. Stagger the ring gaps—do not align them. A common pattern is 120 degrees apart (e.g., top ring at 12 o’clock, second at 4 o’clock, oil ring at 8 o’clock).
Step 3: Lubricate the Piston and Cylinder
Apply a thin layer of engine assembly lube or 20W-50 motor oil to the piston skirts, rings, and cylinder walls. This prevents scuffing during initial startup and ensures smooth break-in.
Step 4: Install the Piston into the Cylinder
Use a piston ring compressor tool to squeeze the rings tightly around the piston. Carefully guide the piston into the cylinder bore with the arrow or mark on the piston pointing toward the exhaust side (usually marked on the engine). Tap the top of the piston gently with a wooden or rubber mallet to seat it fully.
Step 5: Reattach the Connecting Rod
Align the connecting rod with the crankshaft journal. Reinstall the rod cap and tighten the bolts to the manufacturer’s torque specification (typically 12-14 ft-lbs for the GCV160). Use a torque wrench and tighten in two stages to ensure even clamping.
Reassembling the Engine
With the piston and rings installed, reassemble the engine in reverse order.
Step 1: Reinstall the Cylinder Head
Place a new cylinder head gasket on the engine block. Carefully lower the cylinder head into place and install the head bolts. Tighten them in a crisscross pattern to the specified torque (usually 12-14 ft-lbs).
Step 2: Reattach the Muffler, Carburetor, and Air Filter
Reconnect the muffler, carburetor, and air filter housing. Ensure all gaskets are in good condition and all connections are secure.
Step 3: Reinstall the Spark Plug
Install a new spark plug (recommended) and tighten to 18-22 ft-lbs. Reconnect the spark plug wire.
Step 4: Refill Engine Oil
Add the recommended amount of 4-stroke engine oil (typically 0.6 quarts for the GCV160). Check the dipstick to ensure proper level.
Testing and Break-In Procedure
Before putting the engine under load, perform a test run.
Step 1: Prime the Engine
If your GCV160 has a primer bulb, press it 3-5 times to draw fuel into the carburetor.
Step 2: Start the Engine
Pull the starter rope slowly at first. The engine should start within a few pulls. If it doesn’t, recheck the spark plug, fuel flow, and compression.
Step 3: Break-In the New Rings
For the first 5-10 hours of operation, avoid full-throttle running. Operate the engine at moderate loads to allow the rings to seat properly. Change the oil after the first 5 hours to remove any metal particles from initial wear.
Troubleshooting Common Post-Repair Issues
Even after a successful repair, you might encounter issues. Here’s how to address them:
- Engine still hard to start: Recheck compression. Ensure the spark plug is new and gapped correctly. Verify fuel flow and carburetor function.
- Excessive oil consumption: Confirm the oil control ring is installed correctly and not damaged.
- Low compression after repair: Double-check ring orientation and gap. Ensure the cylinder isn’t damaged.
- Knocking or rattling noise: Could indicate incorrect ring installation or connecting rod issues. Recheck torque specs.
Conclusion: Restoring Your GCV160 to Peak Performance
Replacing the piston ring set on a Honda GCV160 engine is a challenging but rewarding repair that can save you hundreds in professional labor costs. By following this guide, you’ve learned how to diagnose compression loss, safely disassemble the engine, inspect critical components, and install new rings with precision. Remember, proper installation—including correct ring gap, orientation, and lubrication—is key to long-term success.
With your GCV160 now starting reliably and running smoothly, you can get back to mowing the lawn, washing the driveway, or powering your equipment with confidence. Regular maintenance, such as changing the oil and air filter, will help extend the life of your new piston rings and keep your engine in top condition for years to come.