
Is your Honda GCV160 engine bogging down under load? This guide walks you through diagnosing and fixing piston ring set problems that cause poor compression, power loss, and rough running. You’ll learn safe disassembly, inspection, replacement, and reassembly steps to restore smooth engine performance.
Key Takeaways
- Engine bogging often stems from worn piston rings reducing compression and causing power loss in the GCV160.
- Always inspect cylinder walls and piston condition before installing new rings to avoid repeat failure.
- Proper ring gap and orientation are critical—incorrect installation can damage the engine or reduce efficiency.
- Use only OEM or high-quality aftermarket piston ring sets compatible with the Honda GCV160 engine.
- Reassembly must follow torque specs and lubrication guidelines to prevent seizing or overheating.
- Test the engine under load after repair to confirm the bogging issue is resolved.
- Regular maintenance prevents premature ring wear—check air filters, oil levels, and fuel quality routinely.
Quick Answers to Common Questions
Tip/Question?
Can I reuse old piston rings if they look okay?
No—even if they appear intact, old rings may have lost tension or developed micro-cracks. Always replace them as a set for reliable performance.
Tip/Question?
How do I know if my cylinder needs honing?
If the cylinder walls feel smooth but have light scoring, a light hone can refresh the surface. Deep scratches or ridges require professional boring.
Tip/Question?
Should I replace the piston when changing rings?
Only if the piston is damaged or worn. If it’s in good condition, just replace the rings and clean the grooves.
Tip/Question?
What if my engine smokes after the repair?
New rings may take 10–15 minutes of running to seat properly. If smoke persists, check ring orientation and oil level.
Tip/Question?
Can I do this repair without special tools?
A piston ring compressor is highly recommended. Without it, rings can break during installation, leading to engine damage.
Introduction: Why Is Your GCV160 Bogging Down?
If you’ve noticed your Honda GCV160 engine—commonly found in lawnmowers, pressure washers, and small generators—struggling under load, sputtering, or losing power when you need it most, you’re not alone. One of the most overlooked yet critical causes of this “bogging down” issue is a failing piston ring set. The piston rings play a vital role in sealing the combustion chamber, maintaining compression, and controlling oil consumption. When they wear out or break, your engine can’t build proper pressure, leading to poor performance, hard starting, and excessive smoke.
This comprehensive troubleshooting guide will walk you through every step of diagnosing, disassembling, inspecting, and replacing the piston ring set on your GCV160 engine. Whether you’re a DIY enthusiast or a small engine technician, you’ll gain the knowledge and confidence to fix this common problem safely and effectively. By the end, your engine should run smoother, stronger, and more reliably—without the frustrating bogging under load.
Understanding the GCV160 Engine and Piston Ring Function
Before diving into repairs, it’s important to understand how the GCV160 engine works and why piston rings are so crucial. The GCV160 is a 160cc, single-cylinder, 4-stroke engine manufactured by Honda. It’s known for its durability and reliability, but like any engine, it wears over time—especially if maintenance is neglected.
Visual guide about Troubleshooting Guide Piston Ring Set on Gcv160 Bogging Down
Image source: pistontribe.com
The piston ring set typically consists of two or three thin metal rings that fit into grooves around the piston. Their main jobs are:
- Sealing the combustion chamber to maintain compression during the power stroke.
- Regulating oil consumption by scraping excess oil off the cylinder walls.
- Transferring heat from the piston to the cylinder wall.
When these rings become worn, cracked, or stuck in their grooves, they can’t seal properly. This leads to compression loss, which directly causes the engine to bog down—especially when under load, such as when mowing thick grass or powering a pressure washer pump. You might also notice blue or white smoke from the exhaust, oil fouling on the spark plug, or a noticeable drop in RPMs when the engine is working hard.
Signs That Point to a Faulty Piston Ring Set
Not every engine problem is due to piston rings, so it’s essential to rule out other common causes first. However, if you’re experiencing one or more of the following symptoms, piston ring failure should be high on your list:

Visual guide about Troubleshooting Guide Piston Ring Set on Gcv160 Bogging Down
Image source: cdn-fastly.thetruthaboutcars.com
1. Engine Bogging Under Load
The most telling sign. Your engine starts fine and idles smoothly, but when you engage the blade or increase throttle, it struggles, sputters, or nearly stalls. This happens because the engine can’t maintain adequate compression to sustain power output.
2. Excessive Smoke from Exhaust
Blue smoke indicates oil burning, which occurs when worn rings allow oil to seep into the combustion chamber. White smoke may suggest coolant leakage, but in air-cooled engines like the GCV160, it’s more likely unburned fuel due to poor compression.
3. Hard Starting or Loss of Power
If your engine cranks but won’t start, or starts but lacks the usual punch, low compression from ring wear could be the culprit. You might also notice it takes longer to reach full speed.
4. Spark Plug Fouling
Remove the spark plug and inspect it. If it’s covered in oily deposits or black soot, it’s a strong indicator that oil is entering the combustion chamber—often due to compromised piston rings.
5. High Oil Consumption
If you’re frequently topping off the oil between uses, worn rings may be allowing oil to burn in the cylinder. Check the oil level regularly and note any rapid drops.
Tools and Materials You’ll Need
Before starting the repair, gather all necessary tools and parts. Having everything ready will save time and prevent mistakes.
Essential Tools
- Socket wrench set (metric, 8mm–14mm)
- Torque wrench
- Piston ring compressor tool
- Piston ring expander or flat screwdrivers (for removal)
- Cylinder hone or deglazer (optional, for smoothing cylinder walls)
- Feeler gauge (for checking ring end gap)
- Clean rags and shop towels
- Compressed air (for cleaning)
- Safety glasses and gloves
Replacement Parts
- OEM or high-quality aftermarket piston ring set (compatible with Honda GCV160)
- New spark plug (recommended during rebuild)
- Engine oil (SAE 10W-30 or as specified)
- Gasket set (including head gasket and valve cover gasket)
- Threadlocker (optional, for bolts)
Safety First
Always work in a well-ventilated area, disconnect the spark plug wire to prevent accidental starts, and allow the engine to cool completely before beginning. Wear safety glasses to protect your eyes from debris.
Step-by-Step: Diagnosing the Problem
Before replacing parts, confirm that the piston rings are indeed the issue. A compression test is the most reliable way to check.
Perform a Compression Test
- Remove the spark plug using a spark plug socket.
- Insert a compression tester into the spark plug hole.
- Pull the starter cord several times while holding the throttle wide open.
- Record the maximum reading. A healthy GCV160 should show 90–120 PSI.
If compression is below 80 PSI, piston ring wear is likely. If it’s extremely low (under 50 PSI), the rings may be broken or the cylinder scored.
Inspect the Spark Plug
Remove and examine the spark plug. A wet, oily plug suggests oil burning. A dry, black, sooty plug may indicate a rich fuel mixture, but combined with low compression, it points to ring failure.
Check for Other Issues
Rule out common causes like clogged air filters, dirty carburetors, or stale fuel. Clean or replace these components first. If the problem persists, proceed to piston ring inspection.
Disassembling the Engine
Now that you’ve confirmed piston ring issues, it’s time to open up the engine. Follow these steps carefully to avoid damage.
1. Drain the Oil and Fuel
Turn the engine on its side and drain the oil into a container. Run the engine briefly to burn off excess fuel in the carburetor, or disconnect the fuel line and drain the tank.
2. Remove the Engine Cover and Air Filter
Unscrew the engine cover and remove the air filter housing. Set aside all components in an organized manner.
3. Disconnect the Spark Plug Wire and Remove the Plug
This prevents accidental ignition and gives you access to the cylinder.
4. Remove the Carburetor and Muffler
Disconnect the fuel line and throttle linkage from the carburetor. Unbolt the carburetor and muffler from the engine block. Label hoses and linkages for easy reassembly.
5. Remove the Cylinder Head
Use a socket wrench to remove the cylinder head bolts in a crisscross pattern to avoid warping. Lift off the head and set it aside with the old head gasket.
6. Remove the Piston and Connecting Rod
Turn the engine upside down. Remove the connecting rod cap bolts and carefully slide the piston and rod assembly out through the top of the cylinder. Be gentle to avoid scratching the cylinder walls.
Inspecting the Piston and Cylinder
With the piston removed, inspect all components for wear or damage.
Check the Piston Rings
Remove the old rings using a piston ring expander or flat screwdrivers. Inspect them for:
- Cracks or breaks
- Excessive wear or thinning
- Rings stuck in the grooves
If any of these are present, replacement is necessary.
Inspect the Piston
Look for scoring, cracks, or excessive carbon buildup. Light carbon can be cleaned with a wire brush, but deep scoring may require piston replacement.
Check the Cylinder Walls
Run your finger along the cylinder wall. If you feel ridges, deep scratches, or uneven wear, the cylinder may need honing or boring. A light crosshatch pattern is normal, but severe damage means the engine may need professional machining.
Measure Ring End Gap
Even if you’re replacing the rings, measure the gap of the old ones for reference. Insert a new ring into the cylinder (without the piston) and use a feeler gauge to check the gap. The correct end gap for GCV160 rings is typically 0.008–0.016 inches (0.2–0.4 mm). If the gap is too small, file it slightly; if too large, the ring may be worn or the cylinder oversized.
Installing the New Piston Ring Set
Now it’s time to install the new rings. Precision is key.
1. Clean All Components
Use carburetor cleaner and a brush to remove carbon from the piston grooves and cylinder. Blow out with compressed air. Ensure no debris remains.
2. Install the New Rings
Start with the oil control ring (usually the bottom one), then the compression rings (top and middle). Use a piston ring expander to avoid damaging the rings.
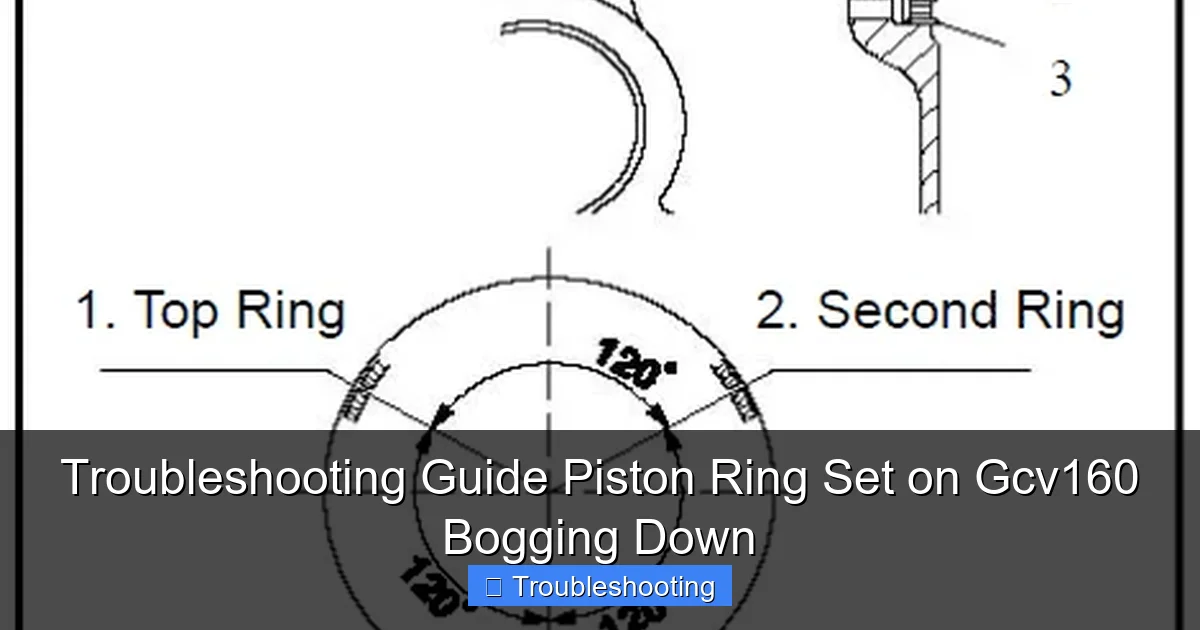
Important: Pay attention to ring orientation. Most rings have a “TOP” marking or a dot that must face upward. Installing them upside down can cause oil burning or poor sealing.
3. Set the Ring Gaps
Rotate the rings so their gaps are staggered—never aligned. A common pattern is 120 degrees apart for three rings. This prevents compression leakage.
4. Lubricate the Piston and Cylinder
Apply a thin layer of clean engine oil to the cylinder walls, piston skirts, and ring grooves. This helps with installation and initial lubrication.
5. Install the Piston into the Cylinder
Use a piston ring compressor to squeeze the rings as you guide the piston into the cylinder. Make sure the arrow on the piston (if present) points toward the exhaust port. Tap gently with a wooden block if needed—never force it.
6. Reattach the Connecting Rod
Slide the connecting rod back into place and secure the rod cap with bolts. Torque to manufacturer specs (typically 10–12 ft-lbs). Use a torque wrench for accuracy.
Reassembling the Engine
With the piston and rings installed, reassemble the engine in reverse order.
1. Replace the Head Gasket
Install a new head gasket on the cylinder. Do not reuse the old one.
2. Reinstall the Cylinder Head
Place the head over the studs and hand-tighten the bolts. Then torque in a crisscross pattern in two stages: first to half torque, then to full spec (usually 14–16 ft-lbs).
3. Reattach Carburetor, Muffler, and Air Filter
Reconnect all components, ensuring fuel lines and linkages are secure. Replace the air filter if dirty.
4. Refill Oil and Replace Spark Plug
Add fresh oil to the recommended level. Install a new spark plug and reconnect the wire.
5. Prime the Engine (if applicable)
Some GCV160 models have a primer bulb. Press it 3–5 times to draw fuel into the carburetor.
Testing the Repair
Start the engine and observe its performance.
1. Cold Start
Pull the starter cord gently. The engine should start within a few pulls. Let it warm up for 2–3 minutes.
2. Check for Leaks
Look for oil or fuel leaks around the head gasket, carburetor, and oil drain plug.
3. Test Under Load
Engage the blade or load (e.g., turn on the pressure washer). The engine should run smoothly without bogging, sputtering, or losing RPMs.
4. Recheck Compression
After running, perform another compression test. You should see a significant improvement—ideally back to 90+ PSI.
Troubleshooting Common Post-Repair Issues
Even with careful work, problems can arise. Here’s how to address them.
Engine Still Bogs Down
Double-check ring orientation and gap placement. Ensure the carburetor is clean and properly adjusted. Verify the air filter is not clogged.
Excessive Smoke
Blue smoke may indicate oil burning. Confirm rings are installed correctly and not upside down. Allow the engine to run for 10–15 minutes—new rings may take time to seat.
Hard Starting
Check spark plug condition, fuel flow, and choke operation. Ensure the carburetor is not flooded.
Low Compression After Repair
This suggests improper ring installation or cylinder damage. Recheck ring gaps and cylinder condition. Consider professional honing if needed.
Preventing Future Piston Ring Failure
Once your engine is running smoothly, keep it that way with regular maintenance.
- Change oil regularly—every 25–50 hours of use or at least once per season.
- Use clean, fresh fuel and add fuel stabilizer if storing long-term.
- Replace air filters when dirty to prevent abrasive particles from entering the cylinder.
- Avoid over-revving the engine, which can accelerate ring wear.
- Inspect spark plugs periodically for signs of oil or carbon buildup.
Conclusion
Fixing a bogging GCV160 engine by replacing the piston ring set is a challenging but rewarding repair. With the right tools, careful inspection, and attention to detail, you can restore your engine to peak performance. Remember, piston rings are a wear item—eventually, they’ll need replacement. But by following this guide and maintaining your engine properly, you’ll extend its life and avoid costly replacements. Whether you’re maintaining a lawnmower or a pressure washer, this troubleshooting knowledge empowers you to keep your equipment running strong season after season.