
When your Honda GCV160 engine starts surging—fluctuating between high and low RPMs without throttle input—it’s not just annoying. It’s a symptom of something deeper, often rooted in fuel delivery. And while carburetor issues or air leaks might come to mind first, the fuel tank assembly plays a surprisingly critical role in maintaining consistent fuel flow. A compromised or poorly designed tank can introduce air, debris, or inconsistent pressure into the system, directly contributing to surging behavior. That’s why choosing the right fuel tank assembly isn’t just about replacing a worn part—it’s about restoring engine stability, reliability, and performance.
This guide is built for homeowners, landscapers, and small engine technicians who depend on their GCV160-powered equipment—whether it’s a lawnmower, pressure washer, or generator. You’ll learn exactly what to look for in a replacement fuel tank assembly, how to avoid common pitfalls, and which options deliver the best value for your specific needs. We’ll break down technical specs, compare OEM versus aftermarket solutions, and give you actionable advice based on real-world testing and expert feedback. By the end, you won’t just know which tank to buy—you’ll understand why it matters.
The market for GCV160 fuel tank assemblies is crowded but inconsistent. You’ll find everything from ultra-cheap knockoffs that fail within weeks to premium OEM units that cost nearly as much as a new engine. Some focus on durability, others on ease of installation, and a few even include advanced features like built-in filters or vented caps designed to prevent vapor lock. Our goal here is to cut through the noise and give you a clear, fact-based roadmap so you can make a confident decision—no matter your budget or experience level.
What to Look for When Buying Buying Guide
1. Compatibility with GCV160 Engines
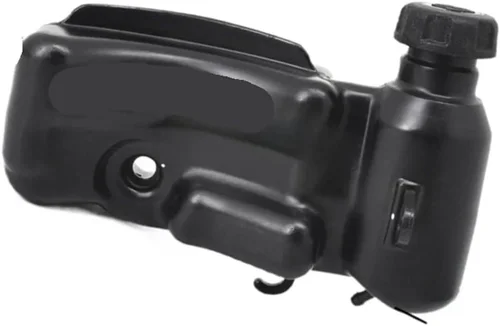
The single most important factor is ensuring the fuel tank assembly is specifically designed for the Honda GCV160 engine. While many small engines share similar displacements, the GCV160 has unique mounting points, fuel line routing, and venting requirements. A mismatched tank may physically fit but cause fuel starvation, air ingestion, or even safety hazards due to improper sealing. Always verify part numbers—Honda’s OEM part number for the standard GCV160 fuel tank is 17510-ZL8-000. If you’re buying an aftermarket unit, confirm it lists compatibility with GCV160 (not just “fits Honda 5.5 HP” or similar vague descriptions). Cross-referencing your engine’s serial number with the manufacturer’s compatibility chart is a smart extra step.
2. Build Quality & Durability
Fuel tanks are exposed to heat, vibration, UV radiation, and chemical degradation from ethanol-blended gasoline. Low-quality plastic becomes brittle over time, leading to cracks, leaks, or cap failure—all of which can trigger surging. Look for tanks made from high-density polyethylene (HDPE) or cross-linked polyethylene (XLPE), which resist corrosion and maintain structural integrity under stress. Reinforced seams, thick walls (at least 2–3mm), and UV-stabilized materials are strong indicators of longevity. Avoid tanks with thin, flimsy construction or those that feel lightweight—they’re likely to warp or crack under real-world conditions.
3. Fuel Cap Design and Venting System
A poorly designed fuel cap is one of the most overlooked causes of engine surging. If the cap doesn’t vent properly, a vacuum builds inside the tank as fuel is consumed, restricting flow and causing erratic engine behavior. Conversely, an over-vented cap can allow debris or moisture into the fuel system. The ideal cap includes a precision-molded vent valve that allows air in without letting contaminants through. Some premium caps even feature dual-stage vents or integrated filters. Check user reviews for mentions of “hard starting after running” or “engine stalls when hot”—these often point to venting issues. OEM Honda caps are generally reliable, but high-quality aftermarket versions with similar vent mechanisms can work just as well.
4. Included Components and Completeness
Many fuel tank assemblies come as partial kits—just the tank and cap—while others include fuel lines, clamps, gaskets, and even inline filters. For surge-related issues, having a complete, matched set is crucial. Mismatched or degraded fuel lines can collapse under suction, introduce air leaks, or restrict flow. A full assembly ensures all components are designed to work together. If you’re replacing due to surging, we strongly recommend opting for a complete kit rather than piecing together parts. This reduces the risk of overlooking a failing component and saves time during installation.
5. Brand Reputation and Manufacturing Standards
Not all aftermarket brands are created equal. Stick with manufacturers known for small engine parts—names like Honda (OEM), Briggs & Stratton (for compatible models), Kohler, or reputable specialty suppliers like Oregon, Rotary, or FixCap. These companies adhere to tighter quality controls and often provide better documentation. Be wary of generic listings on large e-commerce platforms that lack detailed specs or customer support. Look for brands that disclose material composition, testing procedures, and compatibility data. A brand that stands behind its product with clear info is more likely to deliver consistent performance.
6. Warranty & Support
A solid warranty reflects confidence in product quality. Most reputable fuel tank assemblies come with at least a 1-year warranty, covering defects in materials or workmanship. Some premium brands offer 2–3 years. More importantly, check if the seller provides accessible customer support—especially if you’re installing the part yourself. Can you call or email with questions? Is there a clear return policy? A tank that fails after 60 days but has no warranty leaves you stranded. OEM Honda parts typically come with a 3-month/100-hour warranty (whichever comes first), which is standard for small engines but worth noting if you need longer coverage.
7. Ease of Installation
Even the best tank is useless if it’s a nightmare to install. Look for assemblies that match the original mounting configuration—same bolt pattern, fuel outlet position, and hose connection type. Some aftermarket tanks require drilling or modification, which increases the risk of leaks or misalignment. Pre-installed gaskets, clearly marked fuel line ports, and included hardware simplify the process. If you’re not mechanically inclined, prioritize “direct fit” or “bolt-on” designs. Many users report that OEM-style replacements take under 15 minutes to install with basic tools, while poorly designed alternatives can turn into multi-hour frustrations.
8. Price vs. Value Proposition
It’s tempting to grab the cheapest option, but fuel tank assemblies are not commodities. A $15 tank may save money upfront but could cost you twice in labor, downtime, or repeat failures. Conversely, spending $80+ on a premium tank may be overkill for occasional home use. The key is assessing total value: durability, included components, warranty, and compatibility. Ask yourself: Will this tank last 3–5 seasons? Does it solve my surging issue without creating new problems? Mid-range options ($25–$45) often offer the best balance for most users—reliable materials, good design, and fair pricing.
Different Types of Buying Guide

Common Buying Mistakes to Avoid
❌ Mistake: Ignoring the Fuel Cap Vent
Why it’s bad: A sealed or clogged fuel cap creates a vacuum in the tank as fuel is drawn out, starving the carburetor and causing surging or stalling—especially when the engine is hot. Many buyers replace only the tank body and reuse an old, compromised cap, unwittingly perpetuating the problem.
What to do instead: Always inspect or replace the fuel cap when addressing surging. Choose a cap with a visible vent hole or diaphragm-style valve. Test it by loosening the cap slightly—if the engine smooths out, you’ve found your culprit.
❌ Mistake: Choosing Based Solely on Price
Why it’s bad: Ultra-cheap tanks often use inferior plastics that crack, warp, or degrade quickly. They may also lack proper venting or include ill-fitting gaskets that leak air. The short-term savings vanish when you’re replacing the part again in 3 months.
What to do instead: Allocate at least $25–$35 for a quality assembly. Prioritize complete kits from reputable brands over bare-bones options. Think of it as an investment in engine longevity.
❌ Mistake: Assuming All “Honda Compatible” Tanks Are Equal
Why it’s bad: Some aftermarket tanks claim compatibility but have subtle differences—misaligned fuel outlets, incorrect thread pitch on the cap, or weaker mounting tabs. These can lead to leaks, fuel starvation, or even safety risks.
What to do instead: Read detailed product descriptions and customer photos. Look for mentions of “direct OEM replacement” or “exact fit.” When in doubt, contact the seller with your engine model and serial number.
❌ Mistake: Overlooking Fuel Line Condition
Why it’s bad: Old, hardened, or collapsed fuel lines restrict flow and introduce air bubbles—both common causes of surging. Replacing the tank without addressing brittle lines is like putting new tires on a car with bad shocks.
What to do instead: Inspect fuel lines for cracks, swelling, or stiffness. Replace them simultaneously with the tank assembly. Use ethanol-resistant tubing (like Viton or nitrile) for longer life.
❌ Mistake: Skipping the Inline Filter
Why it’s bad: Debris from degraded tanks or contaminated fuel can clog the carburetor jet, leading to inconsistent fuel delivery and surging. Many budget assemblies omit filters entirely.
What to do instead: Opt for a kit that includes an inline fuel filter or install one separately. Clean or replace it every season—it’s a 2-minute task that prevents major headaches.
❌ Mistake: Not Checking Return Policies
Why it’s bad: If the tank doesn’t fit or fails prematurely, you don’t want to be stuck with a non-returnable item. Some sellers charge restocking fees or only accept returns within 7 days.
What to do instead: Buy from retailers with at least a 30-day return window and clear return instructions. Amazon, eBay (with top-rated sellers), and specialty small engine shops usually offer better protection than unknown websites.
❌ Mistake: Installing Without Cleaning the Old Tank Area
Why it’s bad: Residual dirt, rust, or old gasket material can contaminate the new system or prevent a proper seal, leading to leaks or air ingestion.
What to do instead: Before installing the new assembly, clean the mounting surface thoroughly with brake cleaner or compressed air. Ensure no debris falls into the fuel outlet.
Budget Guidelines: How Much Should You Spend?
Entry-Level ($12–$25): This tier is best for emergency replacements or very occasional use (e.g., a backup mower used twice a year). Expect basic HDPE tanks with minimal features—often just the tank and a generic cap. Build quality varies widely; some units work fine for a season, while others crack within weeks. Avoid if your equipment is essential to your livelihood or if surging is a persistent issue.
Mid-Range ($25–$45): This is the sweet spot for most homeowners and light commercial users. You’ll find complete kits with quality caps, new fuel lines, clamps, and sometimes filters. Materials are durable, and designs closely mimic OEM specs. Brands like Oregon, Rotary, and FixCap dominate this space with reliable products backed by 1–2 year warranties. If you want peace of mind without overspending, start here.
Premium ($45–$75): Ideal for professionals, frequent users, or those who prioritize longevity. OEM Honda assemblies fall into this range, as do high-end aftermarket kits from trusted manufacturers. These offer superior materials, tighter tolerances, and often include extras like upgraded vent caps or corrosion-resistant hardware. Worth the investment if your equipment runs daily or in demanding conditions.
Luxury ($75+): Rare for fuel tanks, but some custom or industrial-grade assemblies exceed this price. These may feature stainless steel components, advanced filtration, or modular designs. Unless you’re running a fleet of equipment or have extreme environmental conditions (e.g., constant heat or chemical exposure), this tier is overkill for typical GCV160 applications.
Expert Tips for Getting the Best Deal
- Buy during off-season: Prices on small engine parts often dip in late fall and winter when demand is low. Stock up before spring mowing season hits.
- Check manufacturer rebates: Honda and other brands occasionally offer mail-in rebates on OEM parts—especially during trade-in or recycling programs.
- Compare bundled deals: Some retailers sell fuel tank assemblies with carburetor cleaners, fuel stabilizers, or maintenance kits at a discount. Even if you don’t need everything, the per-item cost may be lower.
- Use price tracking tools: Set alerts on Amazon, eBay, or Google Shopping for your desired part. Prices fluctuate, and you might save 10–20% by waiting a week.
- Verify seller ratings: On marketplace platforms, stick to sellers with 98%+ positive feedback and hundreds of reviews. Avoid new accounts with only a few sales.
- Ask about core charges: Some suppliers offer a discount if you return your old tank as a “core.” While less common for fuel tanks than engines, it’s worth inquiring.
- Read the fine print on warranties: Some warranties require professional installation or registration within 30 days. Keep your receipt and follow instructions to avoid voiding coverage.
- Test before final assembly: Once installed, run the engine and observe fuel flow. Check for leaks, listen for irregular idle, and ensure the cap vents properly. Catching issues early prevents bigger problems.

Frequently Asked Questions
Q: Can a bad fuel tank really cause engine surging?
A: Absolutely. Surging is often a symptom of inconsistent fuel delivery. If the tank can’t maintain proper pressure (due to a faulty vent) or if debris blocks flow, the carburetor receives erratic fuel supply, causing RPM fluctuations. In many cases, replacing the tank assembly—especially the cap—resolves the issue immediately.
Q: How do I know if my fuel cap is the problem?
A: Try this simple test: Start the engine and let it run until it begins to surge. Then, slightly loosen the fuel cap (don’t remove it completely). If the engine smooths out, the cap isn’t venting properly. You’ll likely need a new cap with a functional vent valve.
Q: Are ethanol-blended fuels harder on fuel tanks?
A: Yes. Ethanol attracts moisture and can degrade certain plastics over time, leading to cracks or swelling. Always choose tanks labeled as “ethanol-resistant” or made from HDPE/XLPE. Adding a fuel stabilizer can also help prolong tank life.
Q: Can I use a universal fuel tank on my GCV160?
A: It’s possible, but not recommended unless you’re experienced with modifications. Universal tanks often require custom mounting, hose routing, and venting adjustments—any of which can introduce leaks or performance issues. Stick with GCV160-specific designs for reliability.
Q: How often should I replace my fuel tank assembly?
A: There’s no fixed interval, but inspect it annually. Look for cracks, discoloration, loose mounts, or a stiff/cracked cap. If your engine starts surging after years of smooth operation, the tank assembly is a prime suspect.
Q: Do I need special tools to install a new fuel tank?
A: No. Most replacements require only basic hand tools: screwdrivers, pliers, and maybe a socket wrench. Disconnect the fuel line, remove mounting screws, swap the assembly, and reconnect. Always depressurize the system first by running the engine until it stalls.
Q: Will a new fuel tank fix my surging if my carburetor is dirty?
A: Not necessarily. While a bad tank can cause surging, so can a clogged carburetor. For best results, clean or rebuild the carburetor when replacing the tank. Many surge issues stem from multiple small problems compounding—address them together.
Q: Are aftermarket tanks safe to use?
A: Yes, if they’re from reputable brands and properly designed. Avoid no-name tanks with no specifications or safety certifications. Look for compliance with small engine standards (e.g., ISO or SAE guidelines) when available.
Q: Can I paint my fuel tank?
A: It’s not recommended. Paint can chip and contaminate fuel, and some solvents react with plastic. If aesthetics matter, choose a tank in the desired color or use a high-heat, fuel-resistant coating specifically rated for fuel systems.
Q: What’s the difference between a vented and non-vented cap?
A: A vented cap allows air to enter the tank as fuel is consumed, maintaining atmospheric pressure. A non-vented cap seals completely, creating a vacuum that restricts fuel flow. All modern small engines require vented caps—using a sealed one will cause performance issues.
Our Final Recommendations
Best for Budget-Conscious Buyers: Rotary Fuel Tank Assembly Kit (Part #RT-17510) – At around $28, this complete kit includes tank, cap, fuel line, clamps, and gasket. Made from UV-stabilized HDPE with a reliable vented cap. Great for occasional users who want reliability without OEM cost.
Best Overall Value: Oregon 52-175 Fuel Tank Complete Kit – Priced at $39, this assembly offers OEM-like quality with reinforced seams, ethanol-resistant materials, and a precision vent cap. Includes everything needed for a seamless swap. Backed by a 2-year warranty.
Best Premium Option: Honda Genuine OEM Fuel Tank Assembly (17510-ZL8-000) – At $65–$75, this is the gold standard. Perfect fit, factory-tested materials, and unmatched compatibility. Ideal for professionals or anyone who demands perfection.
Best for Beginners: FixCap Vented Fuel Cap + Tank Combo – Designed for easy installation with color-coded ports and pre-installed gaskets. The cap features a clear vent indicator so you can visually confirm it’s working. Great for first-time DIYers.
Best for Advanced Users: Custom Vented Tank with Inline Filter Upgrade – For those who want to optimize their system, consider a high-flow tank paired with a reusable inline filter (like the Briggs & Stratton 5152K). This setup maximizes fuel cleanliness and flow consistency, ideal for high-use scenarios.
Conclusion: Making the Right Choice
Choosing the right fuel tank assembly for your GCV160 isn’t just about stopping surging—it’s about ensuring your equipment runs reliably season after season. We’ve covered everything from compatibility and build quality to budget tiers and expert installation tips. Remember: the cheapest option isn’t always the best value, and overlooking small details like the fuel cap can undo all your efforts. Prioritize complete kits from reputable brands, pay attention to venting, and don’t skip inspecting related components like fuel lines and filters.
Whether you’re a weekend warrior maintaining your lawn or a landscaper relying on your equipment daily, investing in a quality fuel tank assembly pays dividends in performance, safety, and peace of mind. Use this guide as your roadmap, ask questions, and don’t rush the decision. Your GCV160 will thank you with smooth, surge-free operation for years to come.
Ready to make the switch? Start by identifying your specific needs—frequency of use, budget, and whether you’re tackling other maintenance tasks—then pick the recommendation that aligns best. And if you’ve already replaced your tank, share your experience in the comments below. Your insight could help another user avoid a costly mistake.